Jason Davis • Sep 21, 2015
How to Download Weather Satellite Images from Space
During the LightSail test mission, dozens of radio trackers around the world tuned in to our spacecraft's signal. Many of you sent us beacon packets, some of which were very helpful in telling us what our spacecraft was doing when it was out of range of our U.S.-based tracking stations.
For our second flight—still tentatively scheduled to launch on a SpaceX Falcon Heavy in Sept. 2016—we'd like to better support and leverage the radio community. Our ultimate goal is building a software tool that will help LightSail trackers capture and submit data to our packet repository in real-time. Other missions, like the University of Michigan's GRIFEX CubeSat, have done this.
We also want to make tracking LightSail an inclusive activity that anyone, including folks without any prior radio experience, can enjoy. (Providing you live within range of LightSail's 24-degree inclination orbit—we'll calculate a specific latitude range for that.)
Since I'm also a radio newbie, we figured a good initial task would be seeing how hard it was for me to get my own Software Defined Radio (SDR) system up and running, at a relatively low cost, and perform a few basic exercises. In other words, if I can figure it out, I can write how-to guides for everyone else.
So, how am I doing?
Reasonably well, thanks to tech support from Justin Foley and John Bellardo, two radio experts at Cal Poly San Luis Obispo, LightSail's primary ground station. Early on, I found a guide by Matt Gray explaining how to download images from NOAA weather satellites. I figured this would be a good starting exercise, and now that I've had a few successes, I'm ready to post my first SDR activity guide. Here are a few caveats:
- I can't guarantee success. There is always the risk that you will be out the cost of your equipment and the time invested.
- Feel free to post questions in the comments, but I don't have the capacity to provide unlimited technical support.
- Read through all of the instructions first before deciding whether or not to try this on your own. You will be more likely to succeed if you are computer-savvy and have the patience to Google your way out of a problem.
Let's get started!
The goal
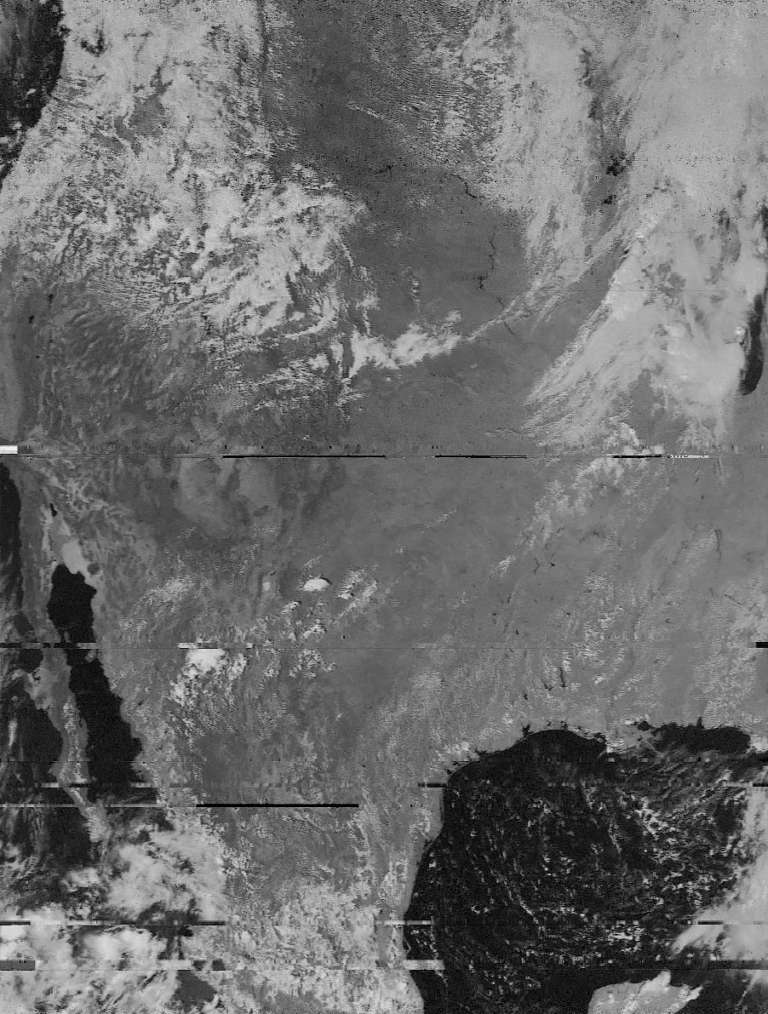
Here is my best weather satellite image to date:
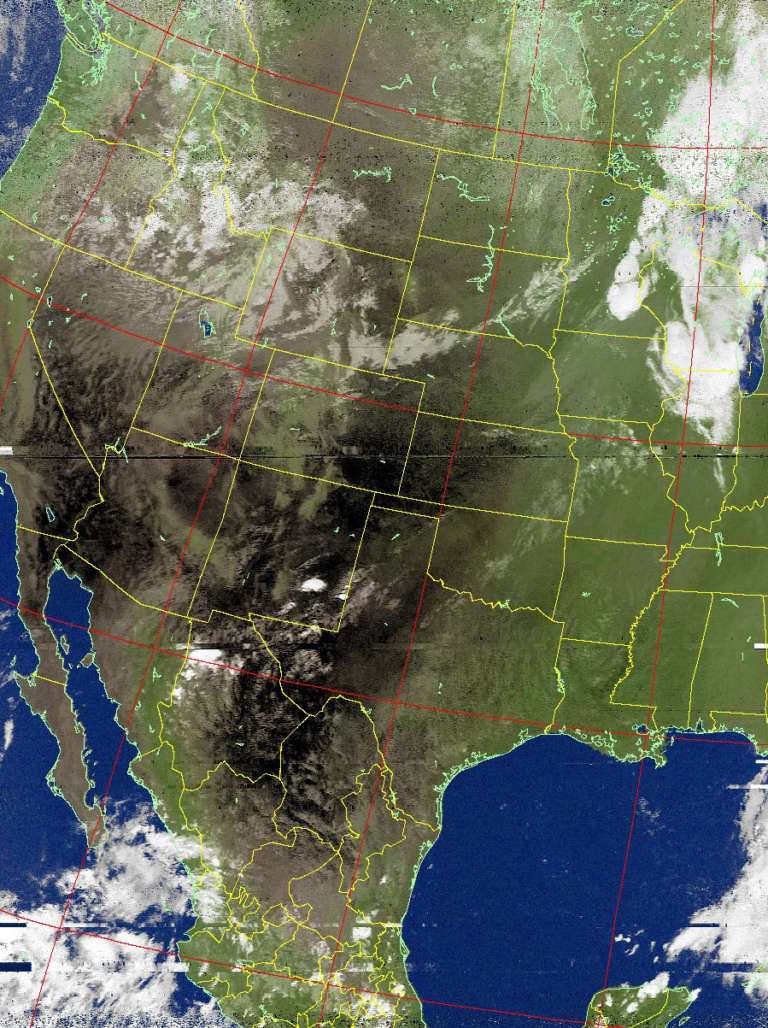
The software package we'll be using can generate approximate true-color versions of the above image and draw map boundaries, like this:
Shopping list
Hardware:
- Tram 1185 Amateur Dual-Band Magnet Antenna
$24.99 (Amazon.com)
- RTL-SDR USB
$12.99 (Amazon.com)
- RF coaxial cable UHF SO239 PL259 female to MCX male right angle connector
$5.70 (Amazon.com)
- Decent Windows or Mac laptop
The assembly here is straightforward. Connect the Tram antenna to your USB stick using the cable adapter, and plug everything in to your laptop.
Location:
You'll get better results if you do this from an area relatively clear of obstructions like buildings and trees, with good horizon-to-horizon vistas. For me, this is a nearby park. If you can drive to your location, try sticking the magnetic Tram antenna on the top of your vehicle. Your vehicle's metallic body will become a large ground plane and improve the antenna's reception.
Software:
SDR program
Windows: SDR Console
Mac/Windows: Cubic SDR
I like the simplicity of Cubic SDR, but found it used a lot of processing power and overheated my laptop a couple times. SDR Console requires more initial configuration, but it's feature-rich and uses less overhead, so I've switched to it entirely.
Weather satellite image processing
Mac/Windows: WXtoImg
Audio piping program
Windows: VB-Audio Virtual Cable
Mac: Soundflower
You'll use this software to pipe the satellite's audio signal from your SDR program into WXtoImg.
Configuration
First, install your audio piping program. Both VB-Audio and Soundflower are easy to install. Here's what the end result should look like on either Mac or Windows. On Mac, it's a program that runs in the background; on Windows, you essentially get a new audio device under the recording tab.
We'll be telling the SDR software to output to either Soundflower or VB-Audio, while WXtoImg will use Soundflower or VB-Audio as its input.
Next, install WXtoImg. There are a few options to change:
Options > Recording Options: Change your soundcard to either Soundflower or VB-Audio.
File > Update Keplers: Do this every few days to download the latest weather satellite position data.
File > Satellite Pass List: This shows you the upcoming satellite passes for your location. Pay particular attention to MEL (Maximum Elevation). The higher the MEL, the stronger the signal (90 degrees means the satellite will pass directly overhead).
Finally, install your SDR program.
CubicSDR
I recommend you try CubicSDR first because it's the easiest to configure. And if it doesn't overheat your laptop, great!
The lone important setting (besides the satellite frequency, which you'll get from WXtoImg) to change in CubicSDR is Audio Output. Change this to either Soundflower (2ch) or VB-Audio.
Beyond that, the program is easy to use. You set the frequency and center frequencies by clicking the top and bottom of each number to cycle up and down (it took me an embarrassingly long time to figure that out). Once the signal appears, click on it and fine-tune your focus using the closeup window in the upper-left.
A good bandwidth to start with is 36000 (don't worry, I'll provide a final checklist for everything in a bit).
SDR Console
If CubicSDR isn't working for you, give the harder-to-configure (but more feature-rich) SDR Console a try. There are many other programs out there, too.
Installing CubicSDR is straightforward, but you'll get error messages as soon as you try to select your USB port's SDR stick and antenna rig. Here's the fix:
Download Zadig, which allows you to install the latest drivers for your USB stick.
In the Zadig console, click Options > List all devices. Select "Bulk-In, Interface (Interface 0)" from the drop-down and click Replace Driver.
Download RTL SDR, which contains a TCP server that allows the USB stick to pipe its signal into SDR Console. (More documentation available here.)
Unzip RTL SDR on your desktop, and open either the x32 or x64 folder, depending on whether you have a 32-bit or 64-bit Windows installation. (Not sure?)
Run rtl_tcp.exe (you may want to create a desktop shortcut, since you have to run this every time you open SDR Console). A small command prompt window will come up; you can minimize this.
Now, open CubicSDR. You'll be prompted to add a new radio. Search for your RTL SDR stick—it should now be showing after all of the work we did above—and click OK:
Use the newly defined radio and get click Start. When I first started the program, the audio came through my speakers—loudly—so you may want to turn them down ahead of time. Then, immediately send that audio to the correct place:
Audio > Playback device > Soundflower or VB-Audio
Now you're ready to download your first image!
Image download
Here's the general order of operations for downloading a satellite image. Make sure you have all of these steps completed at least a couple minutes before the pass begins:
- Run Soundflower (Mac only; VB-Audio should always be available in Windows).
- Open your SDR program and verify the audio output is set to either Soundflower or VB-Audio.
- Tune your SDR to the proper frequency. You can find this in the WXtoImg Satellite Pass List.
- Open WXtoImg and verify the audio input is set to either Soundflower or VB-Audio.
- In WXtoImg, go to File > Record. Select "Record and auto process," and "Create Image(s)." Click Auto Record.
WXtoImg will start recording right on time, but don't expect to see a strong signal on your SDR program yet. The signal will gradually fade in as the satellite moves farther into range. Click the waterfall plot to center on it, and in the zoom window, fine-tune your focus. For an example of what the signal looks like, see the above CubicSDR and SDR Console screenshots—both were taken during live passes. Notice how the audio stream you want is actually about a dozen data streams close together in the spectrum.
As the signal strength grows, a raw image will start to form from noise in WXtoImg. The image on the left is visible light; the one on the right is infrared.
Keep an eye on your SDR program throughout the pass to make sure it stays centered on the signal. Because of the Doppler shift, the signal will shift throughout the pass.
And that's it! By default, WXtoImg will process your image in a variety of different modes as soon as the pass is over. You can also click the Raw Images tab to see and reprocess all of your past attempts.
For a color image, try: Enhancements > MCIR map color IR
And to fiddle with your map overlay, go to: Options > Map Overlay Options
Personally, I usually prefer the original black and white visible light image, with no map overlay. It gives me the feeling that I'm a passenger aboard the weather satellite, looking down at myself, the space nerd in the parking lot with a radio antenna on his car roof.
Support our core enterprises
Your support powers our mission to explore worlds, find life, and defend Earth. You make all the difference when you make a gift. Give today!
Donate

 Explore Worlds
 Find Life
 Defend Earth