Björn Jónsson • Sep 06, 2012
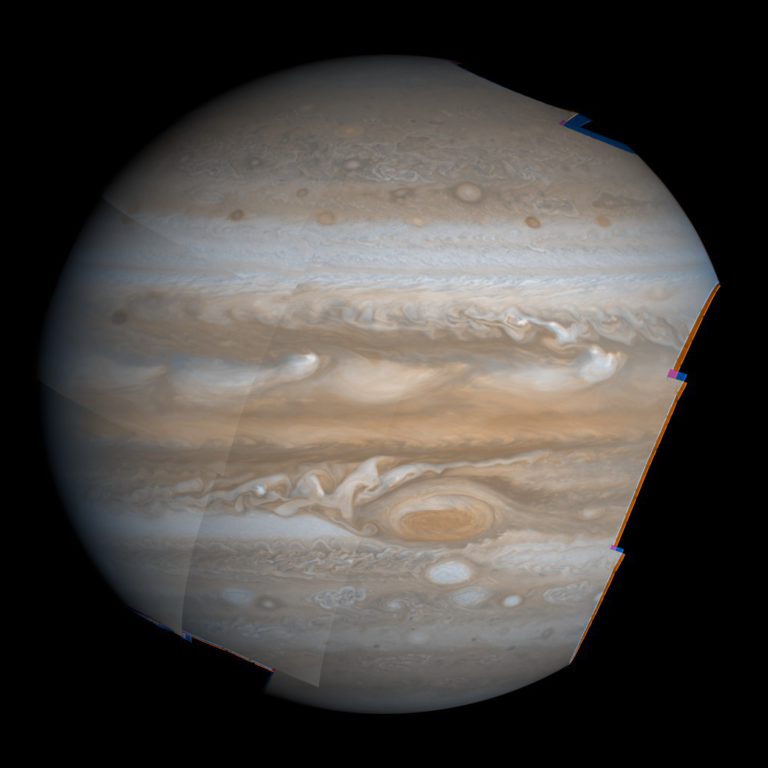
A Voyager 1 anniversary mosaic
Back in 1979 the twin Voyager 1 and 2 spacecraft flew by Jupiter, returning thousands upon thousands of images of the giant planet and its satellites. During the flybys, some of these images were processed into color images and mosaics that have appeared countless times in books, magazines, on TV and on the Internet. Many of these images and mosaics are spectacular but they were processed more than 30 years ago using computers that are extremely primitive by today's standards. It's possible to get better results by processing the original, raw images from the Voyagers using modern computers and software. All of the raw Voyager images are available for download at NASA's Planetary Data System.
Despite the power of today's computers and software, processing the Voyager images can take a lot of time if good results are desired. For best results it's frequently necessary to know the position of the spacecraft and the exact direction in which the camera was pointed. Accurate information on the spacecraft's position as a function of time is available at various NASA websites, but the available camera pointing information is usually too inaccurate to be useful. So one of the image processing steps is usually to determine the camera pointing. This is one of the more time consuming steps.
Another problem is that the Voyager images were obtained using more primitive cameras (vidicon television cameras) than today's CCD cameras. They are significantly brighter near the corners than in the center and this problem is much more severe than it usually is in modern images. This needs to be corrected for, using flatfielding, which also removes various more subtle artifacts. Unlike modern CCD images, the Voyager images are also a bit distorted and this distortion varies slightly depending on various factors. To make it possible to correct for this distortion, the raw images contain regularly spaced dark dots known as reseau marks. It is known were each of these would be located in an image free from any distortions and by comparing these locations to the actual locations in an image the distortion can be removed by 'warping' the image. And needless to say the reseau must then be removed to make the image more aesthetically pleasing.
When the reseau have been removed and the images have been geometrically corrected, the processing that follows is fairly similar to the processing of modern images, and the results can be highly rewarding. Below is a 14 frame mosaic of Voyager 1 images obtained on February 27, 1979 when Voyager 1 was 7.4 million km from Jupiter. It is the highest resolution global Voyager mosaic of Jupiter I'm aware of.
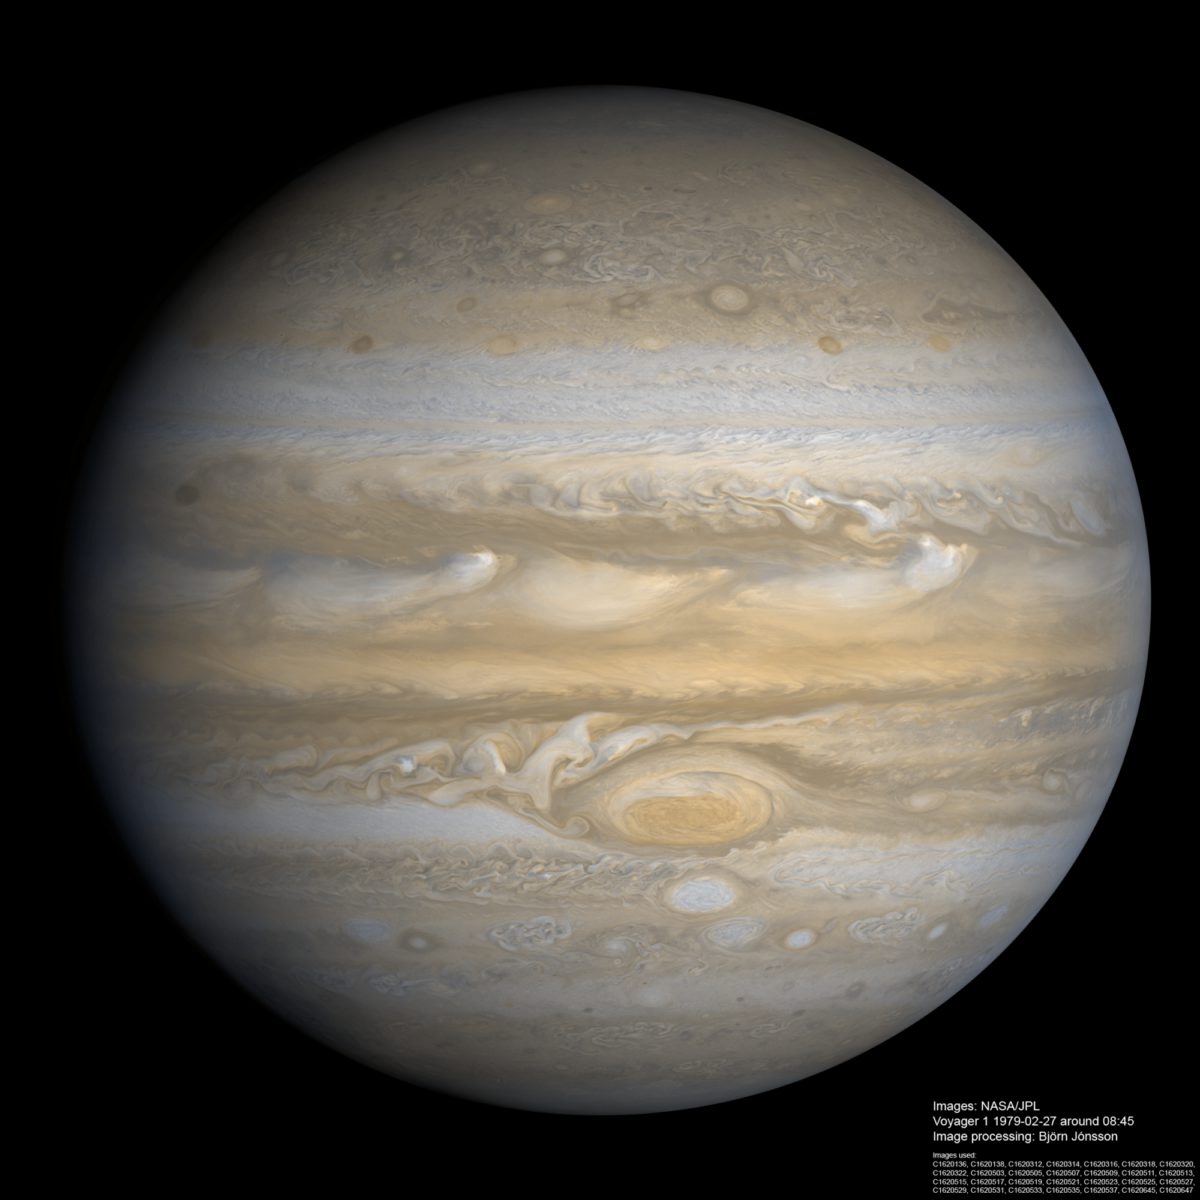
At this time Voyager 1 was imaging Jupiter through two color filters, orange and violet, so a total of 28 individual images was used for the 14-frame mosaic. I synthesized green images from the orange and violet filter data. The spacecraft was acquiring a series of 3x3 global mosaics of Jupiter but one problem is that Jupiter isn't perfectly centered in the mosaics, both due to Voyager's fairly inaccurate pointing and the fact that 3x3 was barely sufficient to cover all of Jupiter's disc as Voyager 1 was getting pretty close to the planet.
This means that in addition to one 3x3 mosaic (9 frames) I had to use 5 additional frames that are parts of two mosaics obtained approximately 60 minutes before and after the 'main mosaic' I used. These were used to fill a significant gap near the limb and smaller gaps near the terminator and in the north polar region. Since the illumination was significantly different in these mosaics because of Jupiter's rotation, a lot of processing in Photoshop was required to hide any seams. This was done using more distant images as a guide - in these images the entire limb is visible. It should be noted that when I'm processing images obtained over a fairly long interval of time into a single mosaic I usually reproject the images to simple cylindrical projection. The result is in effect a latitude/longitude map from the images and I do most of the remaining mosaicking/processing there and finish it by rendering the map onto an ellipsoid.
In the 3x3 mosaic, the images of Jupiter's terminator were acquired more than 20 minutes after the mosaic's first images. Because of this delay, some features that originally were on Jupiter's nightside had rotated into early morning daylight. I only partially compensated for this - in effect the phase angle in my mosaic is roughly 10 degrees lower than it really should be.
Once I had fixed any seams between the images, the final step was to fix the color balance by creating a more accurate synthetic green image and replacing the orange and violet images with synthetic red and blue ones. The green and blue images were created based on least squares fits to measurements from more distant images where green and blue images are available in addition to orange and violet. I then modified the formula for the blue image a bit since the effective wavelength of Voyager's blue filter is a bit longer than the wavelength of 'true blue'. The synthetic red image was created by trial and error simply by determining visually what was in my opinion the best and most realistic result. The final result of all of this processing should have fairly realistic color and contrast.
Interestingly, the synthetic green and blue images created from the least squares fits almost exactly match what one gets when using the effective wavelengths of the relevant color filters to determine the weights of the two color channels used to make a synthetic image instead of measuring this from the images.
For the interested, here is a very brief description of the typical processing steps. The processing is considerably more complicated than this might suggest though, especially steps 8-13. For some of the steps I use software written by myself but the software I spend the largest amount of time using is Photoshop.
For each orange (OR) and violet (VI) image pair:
Once 1-7 was complete for all of the OR/VI pairs there were 14 simple cylindrical OR-GR-VI full color maps to process:
It is my opinion that after all these years the Voyager images are still the best source of data for making high-resolution, multiple-image mosaics of Jupiter. Galileo's mosaics are relatively few and of limited size due to the failure of its high gain antenna and Cassini didn't get nearly as close to Jupiter as the Voyagers did when it flew by en route to Saturn 12 years ago.


 Explore Worlds
 Find Life
 Defend Earth